Hello folks, Hope you are doing fine.
Today, We are gonna talk about a utility-first CSS framework called Tailwind CSS. It’s very popular now-a-days and is specially very useful when you don’t wanna write widely used CSS style again and again. for example,
margin: auto; // or
padding: 0;
Let’s begin then 😉
Agenda #
Create Angular app #
1. Create new Angular app using below command,
ng new angular-tailwind-example2. Make sure you select SCSS for styles in the CLI options like below,

Setup Tailwind CSS #
1. Install Tailwind and it’s dependencies using following command,
npm i tailwindcss postcss-import postcss-loader postcss-scss @angular-builders/custom-webpack -D2. Now import following styles in styles.scss,
@import 'tailwindcss/base';
@import 'tailwindcss/components';
@import 'tailwindcss/utilities';
3. Now initialize tailwind by running below command. Tt will create tailwind.config.js at the root of our project. Leave the created file as is at the moment.
npx tailwind init4. Now, manually create webpack.config.js at the root. And paste below content in it to support tailwind in our project.
module.exports = {
  module: {
    rules: [
      {
        test: /\.scss$/,
        loader: "postcss-loader",
        options: {
          postcssOptions: {
            ident: "postcss",
            syntax: "postcss-scss",
            plugins: [
              require("postcss-import"),
              require("tailwindcss"),
              require("autoprefixer"),
            ],
          },
        },
      },
    ],
  },
};
5. Now let’s modify angular.json file to use our new webpack.config.js using below commands,
ng config projects.angular-tailwind-example.architect.build.builder @angular-builders/custom-webpack:browser
ng config projects.angular-tailwind-example.architect.build.options.customWebpackConfig.path webpack.config.js
ng config projects.angular-tailwind-example.architect.serve.builder @angular-builders/custom-webpack:dev-server
ng config projects.angular-tailwind-example.architect.serve.options.customWebpackConfig.path webpack.config.js
6. After this step, there should be changes in your angular.json file similar to,
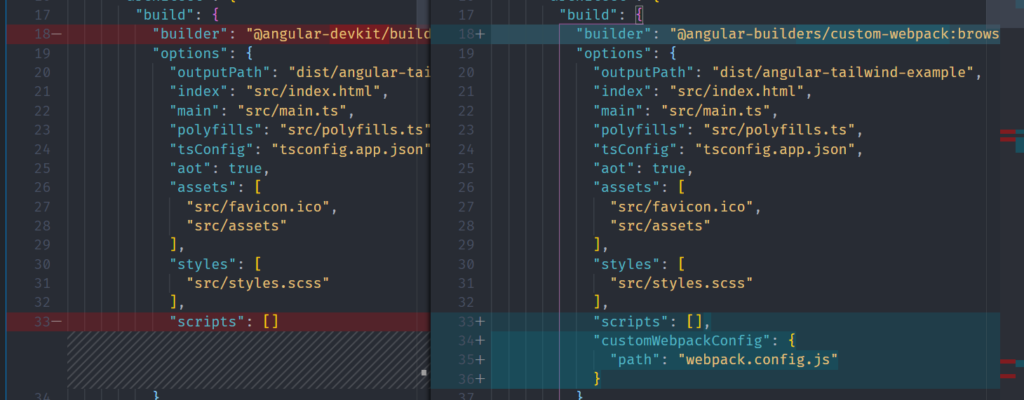
7. This is all you need to do in order to use Tailwind CSS.
Create simple greeting page #
1. Clear all the code from your app.component.html
2. Well, now that everything is ready. Let’s create a simple greeting page using Tailwind CSS.
3. Paste following content in app.component.html,
<div class="w-screen h-screen page-container grid place-items-center">
  <div class="greeting-container grid place-items-center">
    <img class="max-w-xs rounded-full border-solid border-8 border-white" src="https://avatars1.githubusercontent.com/u/24988127?s=460&u=eda1b193658e000ea37580cc0ff97b14a5dafa0c&v=4" alt="Sunset in the mountains">
    <div class="text-center text-white">
      <p class="font-bold text-5xl m-4">Hi, I am Indrajeet 👋</p>
      <p class="uppercase text-2xl mt-16">I <span class="animate-pulse">❤</span> Tailwind CSS</p>
    </div>
  </div>
</div>
4. Paste this in your app.component.scss to get that beautiful dynamic background gradient,
.page-container {
  background-size: 400% 400%;
  background-color: #4158D0;
  background-image: linear-gradient(43deg, #4158D0 0%, #C850C0 46%, #FFCC70 100%);

  -webkit-animation: AnimationName 10s ease infinite;
  -moz-animation: AnimationName 10s ease infinite;
  -o-animation: AnimationName 10s ease infinite;
  animation: AnimationName 10s ease infinite;
}

@-webkit-keyframes AnimationName {
  0%{background-position:0% 50%}
  50%{background-position:100% 50%}
  100%{background-position:0% 50%}
}
@-moz-keyframes AnimationName {
  0%{background-position:0% 50%}
  50%{background-position:100% 50%}
  100%{background-position:0% 50%}
}
@-o-keyframes AnimationName {
  0%{background-position:0% 50%}
  50%{background-position:100% 50%}
  100%{background-position:0% 50%}
}
@keyframes AnimationName {
  0%{background-position:0% 50%}
  50%{background-position:100% 50%}
  100%{background-position:0% 50%}
}
5. Now run your application using, npm start
6. Hurray 🥳🥳🥳, Our application is using Tailwind CSS and it’s looking really good 😉. Can you believe we did it without using single line of CSS expect for Background(optional). Tailwind provides low-level utility classes so that you don’t even have to leave HTML page.

Optimization #
1. Although it all looks great so far, there is an elephant in the room that we have to talk about.
2. When we create a production build of our application using npm run build — –prod. If you observe closely, it creates styles of whopping 1.95 MB 😱😱😱

3. This is mainly because we are not tree-shaking unused tailwind styles in our build process, so tailwind ends up being part of the build as is.
4. To solve this problem, lets configure purge property in tailwind.config.js like below,
module.exports = {
  purge: {
    enabled: true,
    content: ['./src/**/*.html', './src/**/*.ts']
  },
  theme: {
    extend: {},
  },
  variants: {},
  plugins: [],
}
5. Now this will tree-shake all the unused tailwind styles in build process, and will trim it down to optimal size. For understanding about purge in depth, click here.
6. Now create production build one more time. Hurray again 🥳🥳, Checkout the style size again it’s down to only 5.5 kB 😍😍.

Checkout Live Demo here 🚀
If you need some reference, checkout Github Repository.
Know more about Tailwind CSS here.
That pretty much sums it up, hope you enjoyed it. Share it if you liked it.
For more such content click here.
Take care, and keep learning 😎✌